

Pin Cushion Tutorial
These instructions can be used to create different styles of pin cushions as well as pin pillows. These instructions are for personal use only, please do not copy and paste text or photos. If you wish to share, we ask that you link directly back to our post. Thank you!
Pin Cushion Kits Available Here!
Heart and square shaped pin cushions, as well as pin balls, attached to women's aprons were popular throughout the 18th century and are seen in several period paintings and prints. Many examples of original pin cushions survive in museum and private collections. Hanging squares are commonly seen in the 1730s and 1740s while hearts show up more frequently in the 1750s to 1770s. Red and pink seem to be popular colors, but we have noted other colors as well. Pin cushions could be made of plain silk or wool fabric. They could be embroidered or trimmed with ribbon and/or silk floss as seen in some original examples. Sometimes a design or message was created using pins. Utilized by women of all social classes, pin cushions are a functional and handy accessory, and a great way to add some historic detail and personality to your living history impression. (We will be posting a separate tutorial for pin balls.)
We see a slight variation in shape and size when looking at period artwork. Often we see squares with the edges that dip slightly, creating a star-like shape. Some hearts appear perfectly shaped and others a bit elongated. Look to period examples when creating your own.
Pin cushions are a great way to use up smaller pieces of fabric. They are also an excellent and easy project for anyone new to hand sewing. Build your hand sewing confidence with easy stitches and have a finished project that you can use or give as a gift.


Left to right, clockwise - "The Shower" c. 1772; "A Girl Buying a Ballad" by Henry Walton c. 1778; "The Gypsie Fortune-Teller", published by Sayer & Bennett c. 1783; "A kitchen maid", signed HT c. 1783
Materials Needed:
- Wool or silk fabric pieces in a heart or square shapes, two each approximately 5x5 inches, slightly smaller is OK
- Sewing thread, linen or silk depending on your fabric
- Linen or cotton tape for hanging style pin cushion (silk ribbon can also be used). Approximately 24 inches long
- Wool stuffing, approximately 3 to 4 ounces depending on the size of your pin cushion
- Pins and sewing needle
- Beeswax (optional)

Getting Started: If you have purchased one of our pin cushion kits or gift sets you will already have all the materials you need, including the pre cut fabric pieces. If you are using your own materials, start by cutting out your fabric. For square shaped pin cushions, start with two 5x5 inch squares of fabric. For the heart shape, you may wish to use some scrap paper to make a template before cutting. Play around with the shape and size until you have something you are happy with, then use your paper template to trace the shape onto your fabric. You may of course cut your heart shapes free hand! Just be sure you end up with two shapes of equal size.
Step 1: Prep your materials. Iron your fabric if needed and cut your shapes. Cut your tape or ribbon (approximately 24 inches). We are using a blue wool broadcloth and cotton twill tape for our example.
Step 2: Determine the right and wrong sides of your fabric pieces. Lay one piece right side up and place your tape down the center with about 1/2 inch extending past the top edge of your fabric. You may wish to add a pin to hold the tape as shown. Place your second piece of fabric on top, matching your edges all the way around. Your fabric pieces will be right sides together with the tape sandwiched in between. Pin as needed.

Place hanging tape down the center of one piece with 1/2 inch extending over top edge.
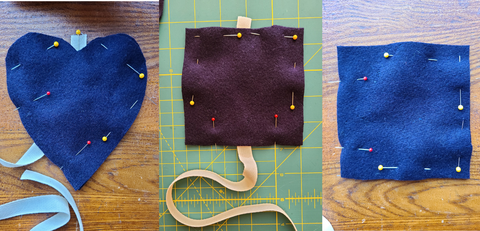
Left to right - Heart and square pin cushions, square pin pillow. Red pins mark opening for turning pin cushion right side out after stitching.
Step 3: Using a running stitch and 1/4 inch seam allowance, sew around your pin cushion. Leave a 2 inch opening. We have marked this with red pins. You may wish to pull the long end of your tape through this opening so it does not get caught as you stitch.


Step 4: Turn your pin cushion right sides out and use your fingers to press the seams. Sometimes a tool such as a knitting needle or bone awl is useful for the corners. Begin stuffing your pin cushion with wool batting.


Step 5: Carefully turn in the edges of the opening and pin if needed. Using a whip stitch sew it closed. This can be a little fiddly. Don't worry if it isn't super neat. In looking at original examples these stitches are sometimes visible.

Step 6: To finish the end of your tape you may do one of two things depending on how you plan to wear your hanging pin cushion. Period artwork clearly shows some pin cushions that are tied to the apron strings, and in other images it is hard to determine. One option is to fold over 1/8 to 1/4 inch of the tape, and again to encase the cut edge and stitch. A second option is to create a small loop to allow your apron strings to pass through. Fold over the cut edge of tape 1/8 to 1/4 inch and again 1/2 to 3/4 inch, forming the loop, and stitch.

Left - Finished end of tape for tying pin cushion to apron string. Right - Finished end of tape with loop for apron string to pass through for hanging.
For Pin Pillows: Follow the instructions above for making a pin pillow minus the tape or ribbon for hanging. Pin pillows vary in size but many surviving examples are approximately 5 or 6 inches across. This is a good size to keep in your sewing basket or work bag.
Original pin cushions
